Sunday, December 12, 2010

Little house on the ..............Ocean

Everything went as planned for the weekend and İ managed to glue the cabin top.

That did not go without a challenge since İ had to work around some considerable gaps between cabin top and F89, and side decks.

The reason is that, while building the cabin top, İ followed the plans and bent and tortured those (rather short !) panels of ply as much as İ could. And forcing the forward tips flat meant having the sides trying to spread wide open. That is what happens when you force a compound curve on something stiff like ply.

Since İ could not go past the "breaking point" so İ stopped bending those panels when İ believed İ had gone as far as possible.

İn other words, I had the overall shape ok but the final assembly did not fit "perfectly ". No big deal really. Just gaps to be filled.

So İ filled from inside the cabin with some small 10cms strips of polar cut at 45 angle. Those where glued with a "secret" mixture of West 403 (Microfibers) / 404 (High Density) / 406 (Silica). İ like to work with that mixture which is easier to work with than just Microfiber and stronger than just Silica.

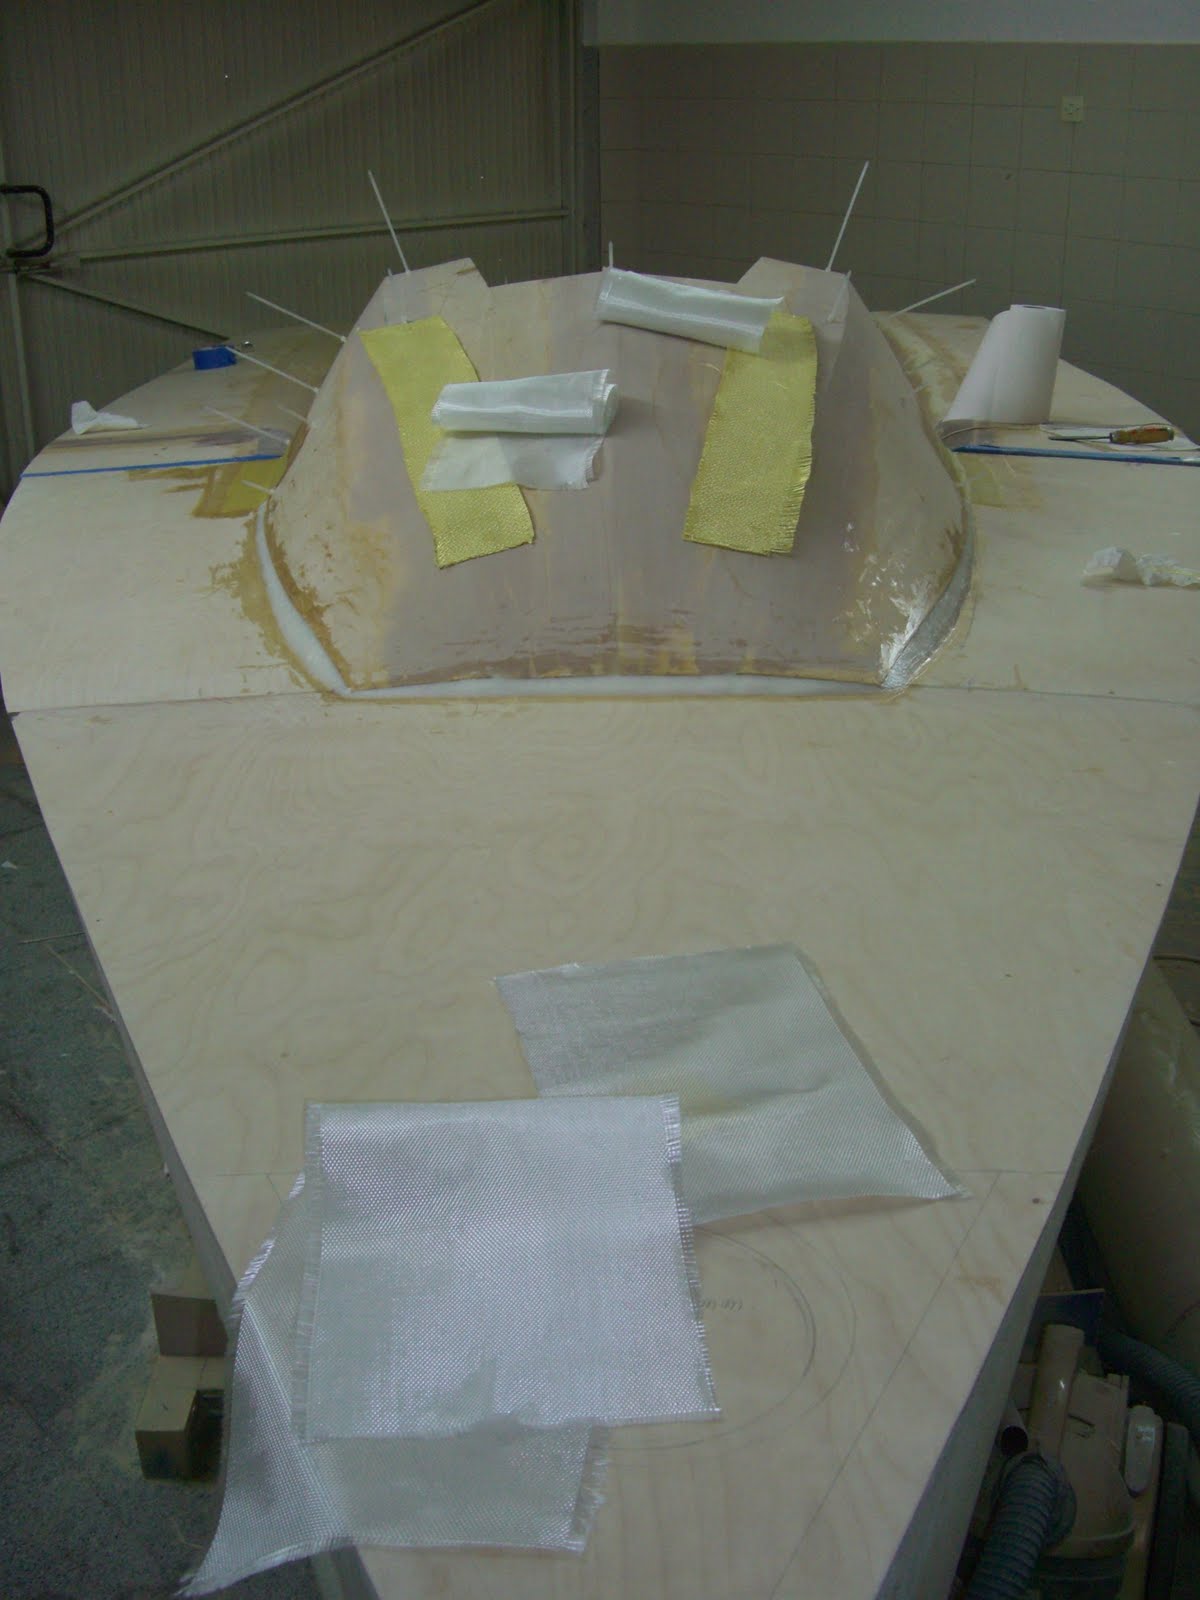
İf you zoom on this picture you will see the little bits İ used to fill the gap inside between cabin top and side decks. You can also see the gap around the sides of F89.


From the outside, İ just used a thick Silica fillet for the side decks to cabin top joints. İ will let that cure than apply fairing filler for a nice final shape befor İ glass it.

Close to F110, where the zip ties where kind of loaded, i used a strip of Kevlar. Again, İ also layed a layer of fiber cloth on top just for finishing aspects. İt looks much better and is gives a much smoother final aspect than just Kevlar by itself.


So İ just have to finish trimming , fairing and glassing and my top will be fully ready.

Then İ will glue the monoblock cockpit and it will be time to laminate the whole thing.

Can't believe İ am actually coming pretty close to have this little dream boat on the water.... :)


İ am taking off to Brazil for 2 weeks for the hollydays so no work planned for the next days. Will be back next year !

Wish you all a merry Christmas and a Happy New Year !


Friday, December 10, 2010

Monoblock cockpit

Finally got my cockpit all together.


It is a big piece that I can hardly move around in my garage.
With the help of my lovely wife we flipped it around and, as with many other builders, put it back upside down on the boat itself 'cause we could not fit it elsewhere !

I then:
-placed all reinforcements plates where I believe they should go. No rocket science here, rather a lot of educated guesses. Hope it works.
Those reinforcements are just small extra pieces of 6mm ply glued to the cockpit underside with Microfibers and on top of which I laminated one single layer of cloth. That is just to prevent that the bolt\washers I use to fix all hardware does not sink in the wood.

-trimmed all the bottom -to-side panels joints. I then rounded them off slightly

-laminated those smooth joints

-laid two layers of resin to seal the wood in case it ever sees any salt water.


After all that work, I flipped it back over and it still fit perfectly. I believe the whole assembly is pretty strudy and I will only glue it to the frames without any additional filet or tape. I dont want to drag myself into that 'dark coffin' between cockpit sole and hull bottom, but I think it will be alright.

Then the wole monoblock structure will be fully laminated from above anyways, so I reckon it will be solid.


Talking about trimming those cockpit joints just reminded me of how great a tool that little Multimaster is. The one I bought is Bosch, not Multifein, but it is great to work with. I use for a lot of applications including trimming all my fiber after curing, cutting holes in hard to reach places (mainly where my jigsaw will not fit). For example, I could not have trimmed my cockpit bottom-to-side panels joints without it. Great tool to have for sure for any builder.


Today is Friday night. Weather forecast indicates crappy rain and maybe even snow, so my plan for the weekend are to relax....................by working on the boat, glue down the cabin top to finish the front part of the boat, go to the wood store to purchase the Red Cedar I need for the rudder, and make a lot of noise with my planner.
Yeah....that sounds just right to me.......
I guess I know why my wife thinks I am nuts !

Cool stripes

Since the cabin was painted, I decided to paint the top cabin panels before assembling them.

I used mask tape to hide the areas that would be later epoxied to the boat frame which ended up giving a pretty cool effect.


The idea was to epoxi first on clear wood then paint it over but I liked the effect to the point where I think I will not paint them any longer.
Only the fillet themselves will be painted over. The rest of the boat will be as is, with a touch of wood just to remind me what it is made of.
It just takes some time and patience to make nice fillet in those hard to reach corner. Thanks God it is no longer super hot in Turkey. Gives my epoxi a better pot life to work with....


Then as one can see on those pictures, I also place the hatches needed for ventilation on all closed sections which includes the bow compartment and the bunks. Easier to work with the bow deck still opened. Will be a much tighter place to work in afterwards so I decided to do as much as possible before.


Then I started closing the panels starting up front with the bow. No big issue there thanks to all the previous dry fitting. I used microfibers to make sure the glueing of the panels was as strong as possible .

Saturday, November 13, 2010

White cabin


First layer of paint went on the cabin. It is looking pretty cool although also I also liked the color of my clear plywood.


But since the cabin is a bit small and very little light will get through , I'd rather have it as clear and spacious as possible. White helps a great deal in that sense.

I used Brightside for the job because I had leftover from my keel job. I also used a spray gun to get some practice since I intend to paint my hull that way.

Josh was great in giving me all the hints but I have to admit that I still have a looooooonf way to go before I am satisfyed with my spraying abilities.

Some panels came out great. Some others were so terrible I had to grab my paint roll to fix it. Overall it is not too shabby but that is because the paint I am using is so good. Brightside is really nice and easy to apply.

My wife after seeing my paint job on the boat, said I could go on and paint the house..... :(

Foot Bensons or straps ?


I might just go both ways ! And so I made Bensons and also epoxied reinforcement plates underneath the cockpit sole.

The bensons were made just like Jeff and Kevin did on their blogs PipeDream and Alchemy so no need to explain the whole thing again. Check their blogs, it is well worth it and we all learned from them.

Main difference is that i did not use zip ties to hold the panel together. Since they form a 90 angle , I laid once piece flat, held the other one at 90 degrees on top of the first one with square blocks I had, applied micro filet of 10mns epoxy, removed blocks, applied normal silica filet. End of story.

Then to reinforce what will be seeing a lot of heavy feet in a few months, I glassed them with 6 once fiber cloth.
I only intend to glue them onto the cockpit floor AFTER laminating the cockpit.


Thursday, November 4, 2010

Lots of sanding

After bunks were glassed, mast compression base was in place and cockpit sides were finished İ was left with a dreadfull mission. Sanding ! Countless hours sanding my cabin interior ! Not a very gratifying job, for sure, but a very important one.


İ made sure that all surfaces, all joints, all filets, all fiberglass tapes edges were smooth as baby skin. All the edges of my kevlar reinforcement strips were sanded, then faired, then sanded again.
İ can probably throw any nylon sail inside without fearing that it will tear as soon as it is pulled out, so mission accomplished.

Once it was smooth enough in every possible corner, İ wiped all surfaces with water and sponge to remove any left over amine blush. Then İ used İnternational 216 thinner to clean them even better. İ finished the prep by blowing compressed air to get rid of the last particles !
İ know it is overdone but, hey, İ enjoy the building process and İ am in no hurry to finish !


Then İ finally primed it with Epoxi Prekote. Yeap, this time İ used the right stuff for epoxy surfaces. But boy does it smell bad !!! İ am really glad İ was wearing an organic respirator for that job !


I will sand it very lightly since my objectif is not to get a mirror finish paint job, and apply Brightside which I have leftover from my keel


.

Cockpit sides

Cockpit sides were finished.


The foam was first faired wherever necessary with fairing filler (İ love working with it) then glassed from above with a large fiber tape.


Then the foam structure was reinforced from below with a long, continous tape of carbon fiber. This was done in order to give the needed strength to the foam part which will probably be abused as soon as İ start sailing the boat. İ mean knees, feet, heavy asses of all sort etc... So İ wanted to make sure this delicate part will hold. İ guess Airex foam + fiber + carbon will do the trick


And then just for fun, although most panels still need heavy trimming, İ dry fitted all of them and sat on the cockpit to check it all out from above.
Getting somewhere. İ am happy !


Bunkers and Compression post base

İ finally glassed the front bunks.

İ cutted large fiber panels and layed them from starboard to port, perpendicular to the carbon fiber İ had already used to reinforce the bottom hull seam. This will give me additional strength at the bottom of the hull.

Just before glassing İ also used fairing filler to round off the bunks edges. Took a little while to get it right but it was worth the effort. The fiber cloth wrapped nicely around those curvy angles.

Then İ moved on to the compression post base.
Not much to say about those except that İ opted for a pyramid of two blocks, glued together, and to the hull and frame, with microfibers. (The picture below shows some rough fairing filler which was then nicely sanded)


The bottom one goes from port bunk stringer to star bunk stringer. İt will help in distributing the forces on the compression mast to the whole stringer structure which was itself reinforced with kevlar.
For the upper block İ switched the grain orientation and it is placed grain up. The base of the compression post will be screwed onto this block.
And last, in order to minimize frictions and wear of F89, İ wrapped it around with a 1 mm alu sheet. So İ will have alu rubbing on alu. We will see how that works.


Saturday, October 2, 2010

Silver bullet


The bulb is done.

I did not have the right tools to do it at home so I went to a metal shop that was willing to help me.

It was quite an interesting experience with about 6 guys working all together trying to get all those 80 kg + of lead melted. They, themselves, didn't quite have the right equipment so we ended up using a large inox recipient that was handy and a massive blowtorch.

We melted a little over 40 kgs of lead for the first pour and it took some time to get really liquid. Lead tends to cool off and harden pretty quickly.

Then we poured one full keel halve at once. The lead was boiling inside the mold and I thought the whole thing would just melt down.

Indeed, on the first halve, the lead close to the mold walls started solidifying before I had placed the wood keel recess . So we had to use the blowtorch on the mold to melt those sides. Than I got really scared that the mold would not take the heat. The edges of the mold turned red hot as we melted the lead to free space for the wood spacer. But it held great and did not desintegrate.

As a matter of fact the molds are just still absolutely perfect. I can give them away to the next builder in Turkey but they are just to damn heavy to be shipped anywhere !


For the second halve, we place the wood spacer before pouring. The lead was boiling like water and the spacer started smoking immediately as we poured. Stange fumes from lead, ciment , wood and epoxi filler were coming out....I am really glad I was using my organic respirator !

That is what the spacer looked liked afterwards. It is made of oak (as the rest of the keel is) and ended up splitting in the middle because of all the heat. I believe a weaker wood could have caught on fire. And maybe I just left the spacer in too long. Anyways, you can see the picture a metal plate and small wood pieces screwed at each end. Doing such assured me that the spacer was in just at the correct place and depth. We just clamped it on the mold. No need to push the spacer down by hand.


But it all came out great. The inside (upper surface) of the bulbs do not look so good but the outsides are really great and will only require minor fairing.


One halve weights at 41,8 kgs, the second at 39,6. Total 81,4kgs. I still have to trim them, take some excess off and drill the holes for the screws. Final weight will be very , very close to the 80kgs as defined in the bulb project.

Two little details that made a world of difference:
1 /I made individual molds. They were already heavy before the lead got in, and they got 40kg heavier after we poured. Overall each mold and lead was about 65kg. It would have been almost impossible to work around with one single mold of 130 kgs.

2/ I put little handles on each side of each mold to make it easier to move them around. I thought about it the night before the lead was poured in and I am glad I did because it would have been really difficult for me to do anything without those handles.


Sunday, September 26, 2010

The BB's rounded edge cockpit method


And that BB stands for "Ben'sBooger". Check it out at bensbooger.blogspot.com and scroll to "Happy cinco de Mayo".


All credits go to him since I just followed on his footsteps and did pretty much the same thing. I really thought about how to do it differently but could not come out with a better approach. Unless one decides to go for the wondefull "curvaceous sisters" of TFord boat (www.nbayracing.com/i550Build.htm) , but that was too much for me. For instance, using zipties to attach the foam to the upper and side panels is probably the best method there is.


The few differences worth noting:

-I used Airex foam. It is a great product used in a lot of composite lamination such as in kiteboards. The stuff is rock hard and tough to grind.

-I shaped the curves with my hand file and nothing else. It worked perfectly on that high density Airex. The orbital planner, if not used carefully, tends to take all the curve out.

-I tabed fromn underneath the foam but my cockpit floor was not in yet so I had plenty of space to work.....Well, actually not that much mainly towards the transom, but nothing claustrophobic.


Opportunities for improvement (for my next i550 !)

1-I cut my strips straight. But of course they should have been curved to follow the top deck panel curve. I just got lucky that the foam took quite a lot of bending without much effort.

2-The first side came out almost perfect. I got cocky on the second side and thought I already knew what I was doing. The result is not too bad but definitly not as good as the first one. Patience is a virtue, and I keep on repeating this to myself. So no need to rush, take your time to shape that foam. It is fun.

Next steps to finish off the monoblock cockpit job :
-laminate a strip of fiber on top of foam. I feel like reinforcing this area before I flip the whole thing. Right now it is only holding by the underneath tabs, rather large ones I should add, but tabs nevertheless.
-unscrew panels, flip and laminate underside of foam . I will most likely use kevlar once more to give more rigidity to the foam part since long segments between frames will actually be unsupported.

-place floor, place sides back in, laminate whole cockpit as monoblock.

-flip once more to laminate the join cockpit floor to sides.
There are added steps to my process but it allows me to work in a quite comfortable manner. The end result should be strong and not necessarily heavier than a normal cockpit since the foam replaced some heavier wood.


Pictures = Halfway through on left and finished curve on right and below


Tuesday, September 21, 2010

İf Beavis and Butthead were fileting with the brown stuff...


Can't resist the temptation to think about what it would be like if Beavis and Butthead were building a boat and had to use West 405 brown stuff İ bought :)


-Hey Beavis, this sucks ! İ ran out of silica !

-Huhhh huhh huh....................well.......you ran out of what ? ......huhhh huhh huh..

-Silica you dumbass ! Cant filet without silica !

-Oh yeah.....silica......cool ! Hey Butthead........?

-Yeap ?

-Why dont you try fileting your own crap ! .huhhh...huhh.....huh .........That would be cool.............huhhh....huhh............huh. .......Filet your own loaf.!

-Heh, hem, yeah, that would be cool.....!

-Huhh...huhh......huh........Turd filet ............huhhh.......huhh.......huh.......that's funny...!

-Woa ! İt does work................Filet from hell ! ............That rocks....!

-Huhhh......huhh..........huh....yeah, silica sucks !


Those guys were my absolute favourite. Too bad they are gone.


Monday, September 20, 2010

Mast compression post

I have started working with the compression post but I am still not sure what the best solution might be. I was really surprised to check on Ron Bowman's blog to find out his mast got ripped off the boat. Don't know what happened to it but plenty of work ahead !

So I will keep playing around with different set ups but right now I am considering a 1mm alu sheet bent around the bottom of F 89 and, on top of it, an alu U channel to minimise friction between pole and bottom of frame and therefore avoid damage to the wood.


The pole itself comes from a broken hanglider that was laying around. That is recycling ! No energy gets lost and I am sure my glider will love reviving as part of a sailboat.

It is 2mm thick wall and is about 6 cm diameter. Strong ! It will be screwed to the frame and will be stepped on another one of my favorite oak blocks shaped to fit. I tried digging / routing a channel on the oak so that the pole actually fits a bit inside the wooden block instead of just sitting on top but the results were really uggly looking. I need to practice more or just forget about it.


Time will tell.

keel sleeve locked in

I closed the keel box and it looks allright but I cannot avoid to be worried about how straight the keel will be.... I will only know for sure once the boat is finished.....

I used solid oak at the bottom and 1" ply (4x 1/4") at the top to lock on the side panels. No real reason for those choices but I felt like making that keel box as solid as possible.


The whole structure feels really solid and bomb proof. Probably overdone. I should be more carefull about weight but since this is my first boat, I would rather make sure it does float and does not fall apart ! So I am focusing on strength for now.


So once this was done I finally finished the forward bunks. A little trimming and a lot of colloidal silica and the trick was done.


And since I ran out of silica, I tried laminating with Nutella. A friend of mine told me it works great so I gave it a shoot. Not too bad I should say, except for the terrible color. Nevermind cause all cabin interior will be painted in white anyhow.


Ps: the Nutella stuff is a joke :) Its West fileting blend and I cannot see anything good about it ! But that is the only stuff they had at the shop. I will wait until they receive more silica.


Monday, September 13, 2010

Plug is off the mold

I am stoked today !
I figured it was about time to try to remove the plugs from the molds and I was a little worried about it. My idea was to 'try' to remove the plugs without damaging them.
So I stopped at a hardware store and bought a couple of spatulas and grinding stones which I believed could be usefull to remove any excess plaster on the sides and free the plugs.

While looking at the rayons (I am like a kid in a candy store !) I saw this neat little tool which kind of looks like a cross between a hammer and a cutting knife. I had never seen one of these nor did I know what this thing was for. But it looked pretty perfect for the job, and it was not expensive. So I bought it.
I started scratching the excess plaster around the edge of the plug and in about two minutes and without any effort the plug came out !


And the mold looks awesome. It is really smooth. No gaps, no nothing, no fairing needed whatsoever. The plug it self does not have one single scratch. It just popped right out and can definitly be re-used many more times, if needed.


I guess laminating the plugs with a layer of fiberglass just to give the pink foam added rigidity AND wrapping them in one single thin layer of saran wrap before plunging them into the wet mortar, was a good idea.
One other thing I did which might have helped is I mixed the mortar / plaster (whatever it is) to a very smooth and pretty "wet" consistency.
It reminded me of the games I play with my daughters while at the beach, staying right on the beach shorebreak and letting our feet slowly sink into the sand everytime a wave passes by. I did the same while pushing the plug inside the mortar. I took my time and used little vibrating movements so the plug would kind of sink by itself. I hope you get the picture.
It worked out perfectly so I am very happy about it. I am also glad I found that little tool which you can see on the picture above. I now understand its main purpose is to remove ceramic tiles but it sure works perfectly for removing foam plugs from mortar molds !