Sunday, December 12, 2010

Little house on the ..............Ocean

Everything went as planned for the weekend and İ managed to glue the cabin top.

That did not go without a challenge since İ had to work around some considerable gaps between cabin top and F89, and side decks.

The reason is that, while building the cabin top, İ followed the plans and bent and tortured those (rather short !) panels of ply as much as İ could. And forcing the forward tips flat meant having the sides trying to spread wide open. That is what happens when you force a compound curve on something stiff like ply.

Since İ could not go past the "breaking point" so İ stopped bending those panels when İ believed İ had gone as far as possible.

İn other words, I had the overall shape ok but the final assembly did not fit "perfectly ". No big deal really. Just gaps to be filled.

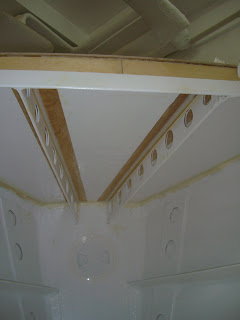
So İ filled from inside the cabin with some small 10cms strips of polar cut at 45 angle. Those where glued with a "secret" mixture of West 403 (Microfibers) / 404 (High Density) / 406 (Silica). İ like to work with that mixture which is easier to work with than just Microfiber and stronger than just Silica.

İf you zoom on this picture you will see the little bits İ used to fill the gap inside between cabin top and side decks. You can also see the gap around the sides of F89.


From the outside, İ just used a thick Silica fillet for the side decks to cabin top joints. İ will let that cure than apply fairing filler for a nice final shape befor İ glass it.

Close to F110, where the zip ties where kind of loaded, i used a strip of Kevlar. Again, İ also layed a layer of fiber cloth on top just for finishing aspects. İt looks much better and is gives a much smoother final aspect than just Kevlar by itself.


So İ just have to finish trimming , fairing and glassing and my top will be fully ready.

Then İ will glue the monoblock cockpit and it will be time to laminate the whole thing.

Can't believe İ am actually coming pretty close to have this little dream boat on the water.... :)


İ am taking off to Brazil for 2 weeks for the hollydays so no work planned for the next days. Will be back next year !

Wish you all a merry Christmas and a Happy New Year !


Friday, December 10, 2010

Monoblock cockpit

Finally got my cockpit all together.


It is a big piece that I can hardly move around in my garage.
With the help of my lovely wife we flipped it around and, as with many other builders, put it back upside down on the boat itself 'cause we could not fit it elsewhere !

I then:
-placed all reinforcements plates where I believe they should go. No rocket science here, rather a lot of educated guesses. Hope it works.
Those reinforcements are just small extra pieces of 6mm ply glued to the cockpit underside with Microfibers and on top of which I laminated one single layer of cloth. That is just to prevent that the bolt\washers I use to fix all hardware does not sink in the wood.

-trimmed all the bottom -to-side panels joints. I then rounded them off slightly

-laminated those smooth joints

-laid two layers of resin to seal the wood in case it ever sees any salt water.


After all that work, I flipped it back over and it still fit perfectly. I believe the whole assembly is pretty strudy and I will only glue it to the frames without any additional filet or tape. I dont want to drag myself into that 'dark coffin' between cockpit sole and hull bottom, but I think it will be alright.

Then the wole monoblock structure will be fully laminated from above anyways, so I reckon it will be solid.


Talking about trimming those cockpit joints just reminded me of how great a tool that little Multimaster is. The one I bought is Bosch, not Multifein, but it is great to work with. I use for a lot of applications including trimming all my fiber after curing, cutting holes in hard to reach places (mainly where my jigsaw will not fit). For example, I could not have trimmed my cockpit bottom-to-side panels joints without it. Great tool to have for sure for any builder.


Today is Friday night. Weather forecast indicates crappy rain and maybe even snow, so my plan for the weekend are to relax....................by working on the boat, glue down the cabin top to finish the front part of the boat, go to the wood store to purchase the Red Cedar I need for the rudder, and make a lot of noise with my planner.
Yeah....that sounds just right to me.......
I guess I know why my wife thinks I am nuts !

Cool stripes

Since the cabin was painted, I decided to paint the top cabin panels before assembling them.

I used mask tape to hide the areas that would be later epoxied to the boat frame which ended up giving a pretty cool effect.


The idea was to epoxi first on clear wood then paint it over but I liked the effect to the point where I think I will not paint them any longer.
Only the fillet themselves will be painted over. The rest of the boat will be as is, with a touch of wood just to remind me what it is made of.
It just takes some time and patience to make nice fillet in those hard to reach corner. Thanks God it is no longer super hot in Turkey. Gives my epoxi a better pot life to work with....


Then as one can see on those pictures, I also place the hatches needed for ventilation on all closed sections which includes the bow compartment and the bunks. Easier to work with the bow deck still opened. Will be a much tighter place to work in afterwards so I decided to do as much as possible before.


Then I started closing the panels starting up front with the bow. No big issue there thanks to all the previous dry fitting. I used microfibers to make sure the glueing of the panels was as strong as possible .