Tuesday, December 3, 2013

i550 in Brazil

My last post was written in March 2012, 1 year and 9 months ago.
That is exactly the time it took this little beauty to cross the ocean and reach home in Rio de Janeiro Brazil.
I will not waste your time and get into details and explain the ordeal I went through, the money I spent on taxes, or all the headaches with the moving company.

 What a feeling, what a relief to finally set eyes on my little boat.

The wooden box built to fit inside the container and the supports custom shaped on the hull bottom worked perfectly to secure the boat at a 45 degree angle during its very long journey from Turkey to Brazil..... Thanks to Chad for showing me how to fit the boat inside the container and thanks for Yalçin who actually build the box.

So hopefully I will post a few more pictures in 2014 of hull 270 sailing in Rio :)


Saturday, March 10, 2012

Mast is ready.

As the weather in Turkey tends to improve a bit, I am again focused on splashing my boat for the first days of Spring.

The mast is finished and looks really beautiful. It was built by a friend of mine, Sacit, who has built some really nice looking masts here in Turkey. I am really grateful to him and believe my boat has never looked any better. On the left side of the picture you can actually see a Didi 26 Sacit also built. Its a really great boat and we race it here in Turkey during the sailing season.


Here are a few more detailled pictures of the mast……


….and the proud owner.


All I need to do now is add sails , some salt water and feel like a real sailor :)

Thursday, December 15, 2011

Out at last... !

…..of my garage that is… :)

It took me about 2 months but I finally found a way to take my boat out of the garage…
It is now at the mast builder s place for fitting. Sailmaker will be called soon for the final phase of this odyssey.
Weather was just perfect today. About 15 C in mid December ! Considering the crappy weather we had about a month ago, this was really amazing !
I was quite apprehensive but thanks to all guys who came to help me it turned out to be quite an easy task. Even lifting the boat up onto the trailer was not an issue. I am not sure how heavy the boat is but 2 guys, one on each side, could lift the transom easily so I hope it will not be too far off from class limits.

And talking about trailers, as you can see in the pictures the one we used was definitely oversized but that was the absolute best I could find. The owner of the trailer, who as also driving the truck, happen to be a boat builder himself and owned one of the largest fiberglass boat factories of Turkey. Wish I had met the man before.


Tuesday, September 20, 2011

Hardware and foot straps


Here are a few pictures of the boat with hardware and hiking straps installed. I am stoked !

Still need to install the rudder plate to consider the boat fully finished. But I am really close....and have a hard time grasping what it means......

What an adventure ! Stop thinking, build !!!


That is the strap adjustment. Simple velcro with 20cm on each side. Gives me plenty of adjustment length to play with the strap height.
I will most likely to play around with bungies to leave them at the right height to facilitate sliding my feet underneath them, but I will leave this fine tuning for later, that is after splashing.


And this is how they look when their height is set up to minimum height, flush with cockpit sole.

Wednesday, September 7, 2011

Kiwi Grip


I am finally really getting close to finishing off the boat, just a few things more and I will focus on setting up the mast (which is done and beautiful !) and getting the sails cut.

So one of the last finishing touches was applying the anti skid paint and i choose to use Kiwi Grip because of all the good things I heard about.
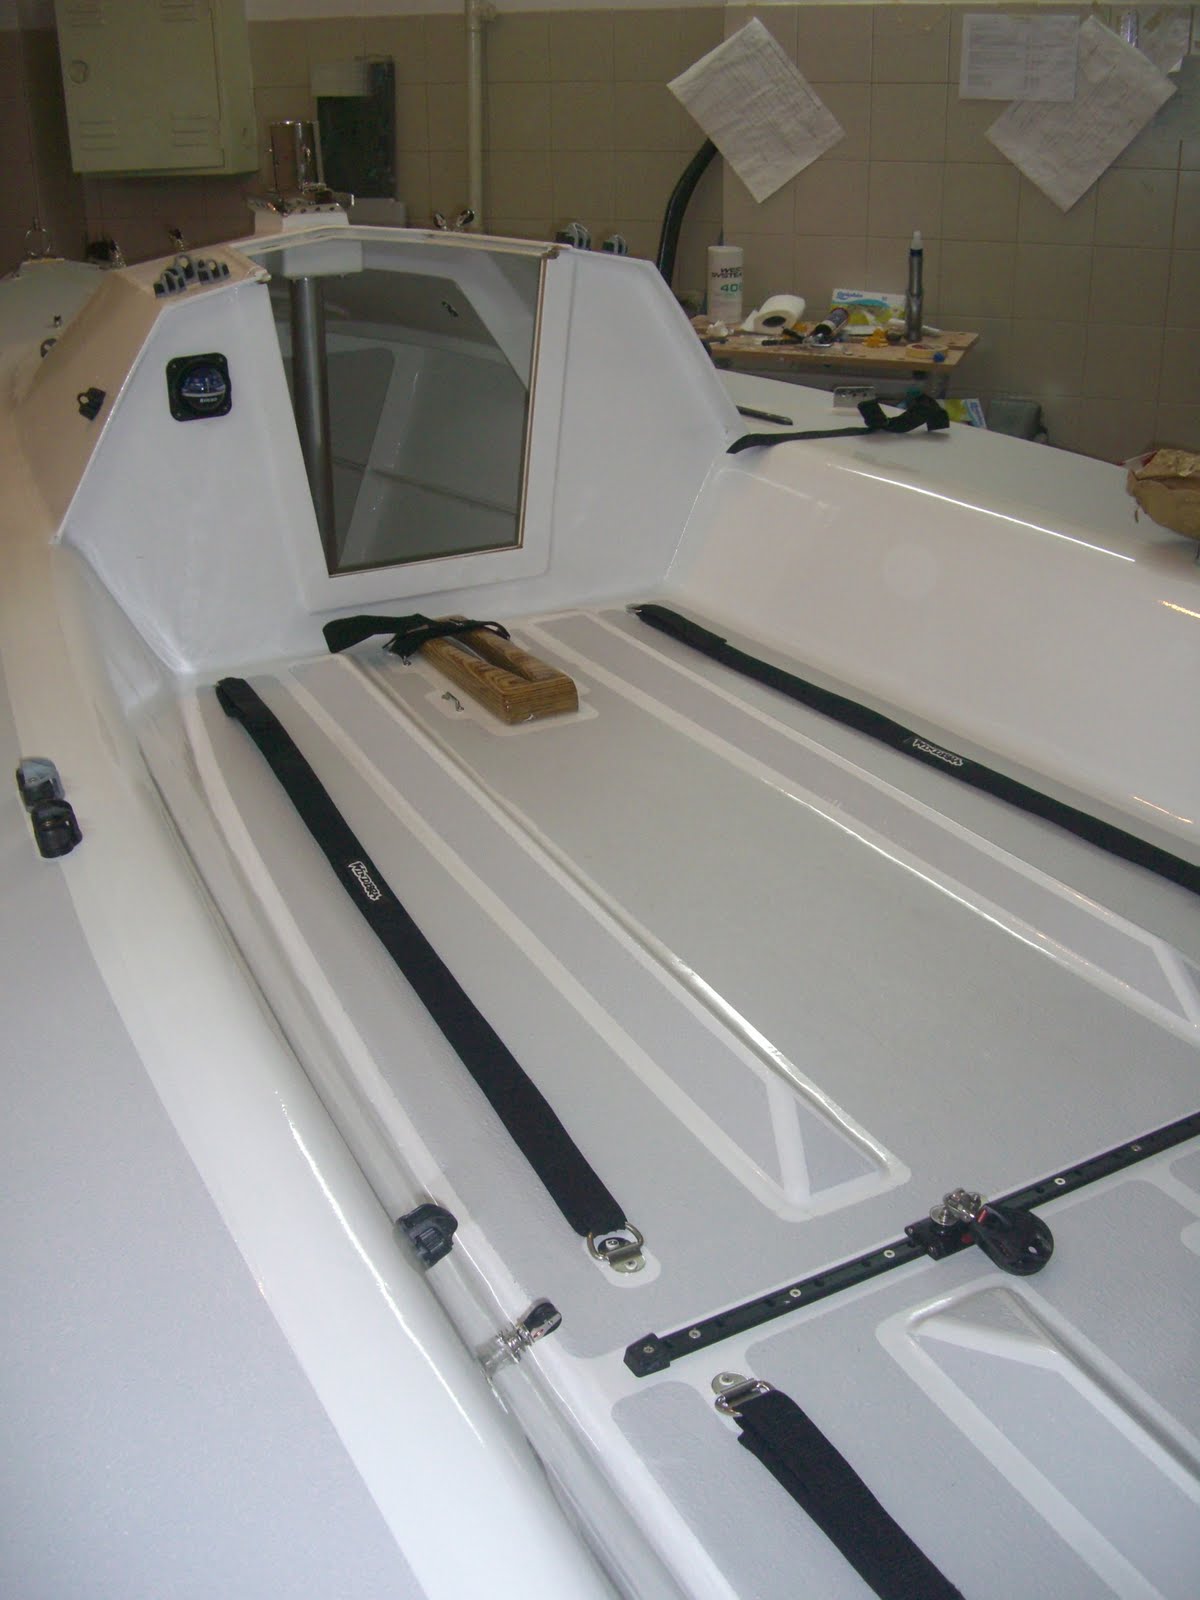
I bought a can of white, which was the only color available in Turkey, and custom colored it to a light grey using a small amount of water based pigment as recommended by the Kiwi manufacturer. 5 minutes on the shaker at the paint shop and my custom grey was ready.

Then I took my time to tape all areas I wanted to keep in the original Perfection White. That is a lot of masking tape !
But the real work was to round off ALL corners. I mean all of them, except the ones I forgot, were rounded off using a large washer as a guide and my cutter.
It was an enjoyable task to do and kept my mind busy for a while, a bit like assembling a puzzle.

Kiwi application was very easy and straight forward. I just use one of the plastic squeegees I had left over from all the epoxy work, threw it down in patches were I needed it, spreaded it all around to achieve a uniform thickness, than gave it its texture using the special roll. More than the force applied to the roll, I found out that it is mostly the amount of gooey you lay down that will change the final texture.
On my boat, I went for a smoother texture on deck sides, where my butt will be, and for a more aggressive texture on the cockpit floor.
One issue I faced, which is worth mentioning, is that in the areas I took too long to remove the tape after applying KG, the tape itself ended up melting down. I mean it started to disintegrate under the Kiwi chemicals, become very soft, and mushy. And I am talking good quality blue tape !
İ removed about 90% of all the tape while the Kiwi was still fresh, but on one of the benson where the tape had been left for about 20 mns, İ only managed to peel off the top of the tape yet the glue and part of the tape material stayed on the benson.

A second of panic (!!!!!) just to think about the possibility of screwing the whole thing up.....and then İ decided to leave it as it was and remove the blue tape left over the following day,after the bordering Kiwi had hardened.
Next day, with a little acetone and finger nails scratching, I removed the blue tape that had been left behind. Thanks God my anti skid paint job was safe. And it looked really sharp !

All that time patiently taping the boat paid off. I really dig the round corners and the white and grey color scheme. Check it out


Tuesday, August 23, 2011

Stainless Steel Shine

Here are a few picture of the bow piece and the rudder plate I will use on my boat. It is all heavy stainless steel. Probably too heavy for most of the racers out there. But I like the shine and glow of those parts.

The bow piece is simple and as you can tell the spi pole will go though it. Might not be class legal because my forestay attachement will stay above the ring and if you project it forward , it will actually meet the deck level forward of bow.
Oh well ! Until another i550 gets build to race me down here, that is what I will have on my boat.

The rudder plate is very straight forward but very cool. The rudder will be pined down by a long rod inserted through the 2 transom and 2 rudder heavy duty gudgeons. The pin is then pushed down, compressing a spring, and hold underneath a hook which is itself welded to the plate.
Should hold well any force applied on the rudder itself. I would be very surprise if those fail before the rudder do.
Shine on....

Non skid taping


Here is a short update on what I have been doing. Boat is almost finished and one of the last building steps will be applying the non skid.

I bought a can of white Kiwigrip which I custom colored to a light grey. Then I masked the boat with blue tape.
That is a long but amusing job to do as it gives you a chance to visually check out for the boat symmetry
.

Still some more taping to do, mainly rounding off the corners of the masking tape, then some sanding to (unfortunately) rough off that glossy Perfection surface, and I ll be ready to spread the Kiwigrip all over the boat. As a matter of fact I really do mean all over as most of the surface will be painted over.

No matter what though, I will leave that keel support as it is because I really dig its zebra look.