İ am really gratefull to all the first builders who documented their builds with great blogs. Those guys are heros because they all did it with no previous references...so many details to think about and those guys did it all for us.
So my special thanks on this post goes to Jeff - Alchemy and Kevin - Pipedream who greatly detailed how to drill lead. What I did was follow their advices...nothing else.

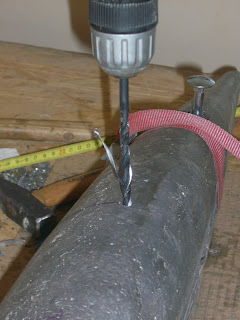
First I used my drill driver to slowly drill the pilot holes with a 6mm metal bit. Went slowly, used oil which made it really easy for the lead to get loose from the bit grooves, and set the clutch to about 14 out of 20. That set up saved me from broken too many bits....Actually the first first bit popped after maybe 1 mn. I was too much in a hurry to drill though that apparent soft material. So I took my time, changed the clutch setting and did not break any other drill bit.

After the pilot hole was drilled all the way through, I drilled the counter sink. For that I used a 22 mm wood spade bit. It worked fine and I removed nice shavings as you can see in the picture.


However I had to switch back to my regular portable drill because my drill driver simply did not have enough power. It does take some stamina to remove large shavings of lead !
After all 8 pilot holes were drilled all the way through the lead bulb halves, I cleaned up the recess space I had left when pouring the lead and adjusted the keel inside .
I took my time to take measurements and be absolutely sure all holes were ok and the keel was fitting nicely in the bulb recess. Long 6mm wood drill bit and holes were very quickly drilled through the hard wood. No turning back !

Than I switched to a larger 10mm bit and re-drilled all holes.
Bingo, I was done.
All I had to do was to remove the very heavy halves, and put them aside on their brand new little cart. It is SOooo easy to move them around my garage now ! No more back pain...

I will now buy the stainless steel bolts, assemble, fair and set aside the whole bulb to keel assembly.
.jpg)


.jpg)

No comments:
Post a Comment