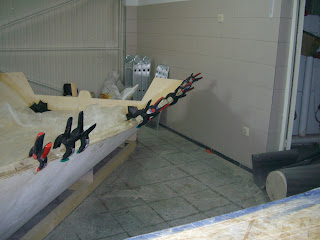
Wouah ! That was a headache. Seems simple but those sheer clamps really gave me a workout !
First concern was that I think the profile İ used (2"x2") was too bigç so they ended up to thick and too strong, therefore somehow reluctant to assume their shape nicely following te curve of the side panels.
Second concern was the 8:1 scarf... Try that on a triangle profile !!! You end up with a sword like pointy piece of wood that sure does not look strong...
So I decided to go a different .......and pretty complicated way......which İ don't recommend anyone to follow !
First i decided to go with 3 segments for each sheer clamp. The building manual mentions not to make the sheer clamps out of more than 2 segments but İ figured that since they do not have any real structural function and since the forward and the aft segments are almost straight, İ might as well go with 3...Another element for that decision was that İ wanted to avoid having a scarf right in the most curved part of the hull, right where the pulling forces on the sheer clamp are greatest
So İ used one almost straight segment at front, a curved segment for the larger hull panel curve and another almost straight segment for the final part of the hull. All joıns were out of the curvy part and İ thought İ had it
Second mistake is that since I did not like the look of the scarf, I decided to butt join my sheer clamp .
I reinforced the butt with strips of carbon............ but that did not work ! Looked pretty good at first but as soon as I force the sheer clamp in place, too much force was applied to the joins and they cracked. Had to work them over and add temporary strips of ply to make sure they would hold.
So by the end of the day I was still working at them but managed to epoxy them in place using many wood screws and clamps.
I then fileted and taped them in place. I was pleased with how they looked at the end but for any builder who has not gotten trough this stage yet, one word of advice: if you can, stick to one long, single piece of wood for your sheer clamps. And if you have to join parts, scarf them (butt joining doe not work) and dont make them out of more than 2 halves. 3 is nonsense. My next hull will be better ! :)
So I will have to wait tomorrow for the resin to fully cure to remove all screws, clamps and plywood strips to make sure everything is really holding strong......
I will keep my fingers crossed !
(Lots of clamps needed ! I used 10 clamps plus about 6 screws on each side. Could have easily used as mnay has 20 clamps per side if I had them handy.)

Next steps for me tomorrow:
-level off clamps with eletric planner
-mark correct distance of all frames on hull
-place frames

.jpg)


.jpg)
Hi Jerome,
ReplyDeleteLooking good.
I didn't sort out the lack of 'V' other than by building it up a little with filler. Be very careful! I thought I was and the V 'dissappeared'between putting in frames and flipping over> I wont give any suggestions, there are already too many, I think, on the forum.
Hi Josh, just placed first frame in today. The hull bottom really looks allright and the V is there....at least for now. For next frames I will be even more carefull to make sure the bottom of all frames really give the hull its needed shape. Thanks
ReplyDelete